Welcome to Learning Word.
If you have questions or comments, please click the comment click below. Comments are moderated.
Start Learning Word.
Remember, you are attempting to learn Word without an instructor. This can be a frustrating process! Do not give up! Also, there are many ways to accomplish tasks in Microsoft applications. In most exercises, you will only learn one way to complete the task. You will find the notes for this class at http://word.schtuff.com. The Excel instructional videos are hosted on Vimeo.com.
Find and Replace
Find Command
1. Open Finished Practice located on your disk.
2. Choose the Edit menu.
3. Click Find.
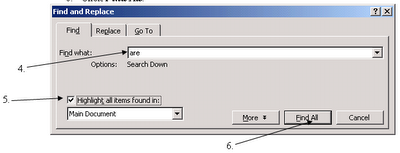
4. In the Find what text box, type are.
5. Check the Highlight all items found in box.
6. Click Find All.
Replace Command
1. Open Finished Practice located on your disk.
2. Choose the Edit menu.
3. Click Replace.
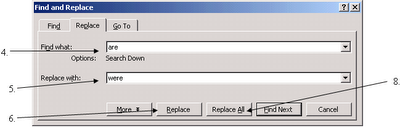
4. In the Find what text box, type are.
5. In the Replace text box, type were.
6. Click Replace button.
7. Notice that only one instance of the word “are” was replaced by “were”.
8. Click Replace All button.
Find and Replace on Vimeo
1. Open Finished Practice located on your disk.
2. Choose the Edit menu.
3. Click Find.
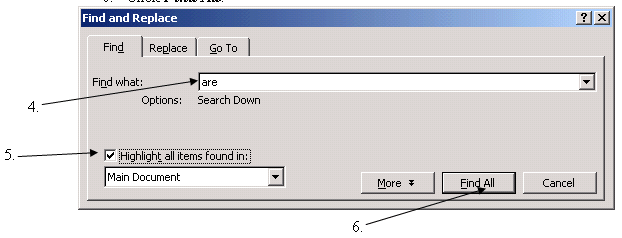
4. In the Find what text box, type are.
5. Check the Highlight all items found in box.
6. Click Find All.
Replace Command
1. Open Finished Practice located on your disk.
2. Choose the Edit menu.
3. Click Replace.
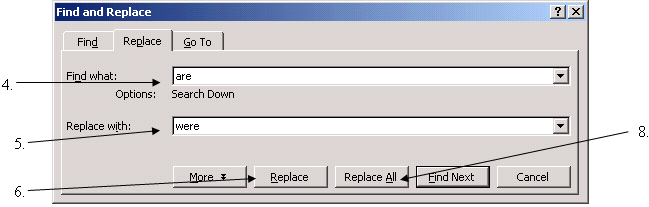
4. In the Find what text box, type are.
5. In the Replace text box, type were.
6. Click Replace button.
7. Notice that only one instance of the word “are” was replaced by “were”.
8. Click Replace All button.
Find and Replace on Vimeo
ClipArt
Inserting ClipArt
1. Choose the Insert Menu.
2. Click on Picture.
3. Click on ClipArt.
4. The Insert Clip Art task pane will open on the right-hand of the screen.
5. Click in the Search text box.
6. Type in a word, such as pen, frog, etc.
7. Click Search.
8. The task pane will show the results of your search.
9. Choose an image and click on the image.
Change the contrast or brightness
1. Click on the ClipArt until the ClipArt has “handles.”
a. “Handles” are the dots that outline the ClipArt when the WordArt/ClipArt can be moved or resized.
2. Choose the View menu.
3. Click on Toolbars.
4. Make sure the Picture toolbar is checked. If not, click on Picture.

5. To change the contrast, click

6. To change the brightness,

From the Picture Toolbar, you can change
• Contrast
• Brightness
• Format
• Text wrapping
• Rotate
• etc.
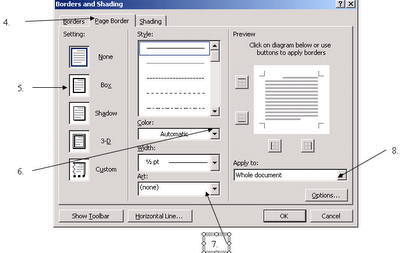
Paragraph Border
1. Open Finished Practice located on your disk.
2. Highlight the last paragraph.
a. To highlight larger blocks of text, click where you want the highlighting to begin and drag the mouse over the text to where you want it to end.
3. Open the Format menu.
4. Click on Borders and Shadings.
5. Make sure you are viewing the Borders window. If not, click on the Border tab.
6. Under Setting, choose the 3-D option.
7. Under Style, choose a style of your choice.
8. Under Color, click on the drop-down arrow and choose a color of your choice.
9. The Apply to setting should be set to Paragraph.
10. Click OK.

Tables
1. Position your insertion point in the area you will be inserting the table.
2. Open the Table menu.
3. Click on Insert.
4. Click on Table.

1. Change the Number of columns to 3.
2. Change the Number of rows to 3.
3. Click OK.
4. A table will appear. The insertion point should be located in the first box.
2. Open the Table menu.
3. Click on Insert.
4. Click on Table.

1. Change the Number of columns to 3.
2. Change the Number of rows to 3.
3. Click OK.
4. A table will appear. The insertion point should be located in the first box.
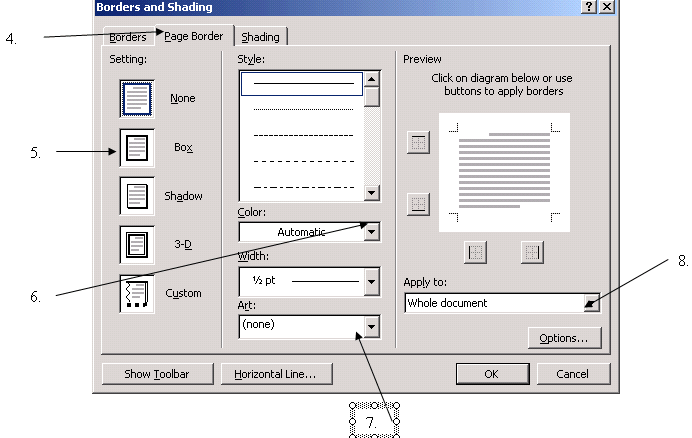
Page Border
1. Open Finished Practice located on your disk.
2. Open the Format menu.
3. Click on Borders and Shadings.
4. Make sure you are viewing the Page Border window. If not, click on the Page Border tab.
5. Under Setting, choose the Box option.
6. Under Color, click on the drop-down arrow and choose a color of your choice.
7. Under Art, click on the drop-down arrow and choose a theme of your choice.
8. The Apply to setting should be set to Whole document.
9. Click OK.
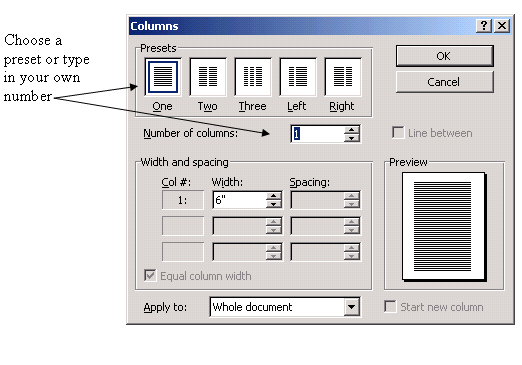
Columns.
1. Open Finished Practice located on your disk.
2. Choose the Edit menu.
3. Click Select All.
4. Choose the Format menu.
5. Click on Columns.
6. Choose the number of columns.
7. Click OK.

C:\Documents and Settings\atyle\My Documents\My Videos\Column on Vimeo
2. Choose the Edit menu.
3. Click Select All.
4. Choose the Format menu.
5. Click on Columns.
6. Choose the number of columns.
7. Click OK.
C:\Documents and Settings\atyle\My Documents\My Videos\Column on Vimeo
Subscribe to:
Posts (Atom)